The Author
Table of Contents
If you’ve ever opened up a solar garden light and found a tangle of wires with no idea what connects to what, you’re not alone. Most manufacturers give you a single-page instruction sheet with two arrows and a prayer.
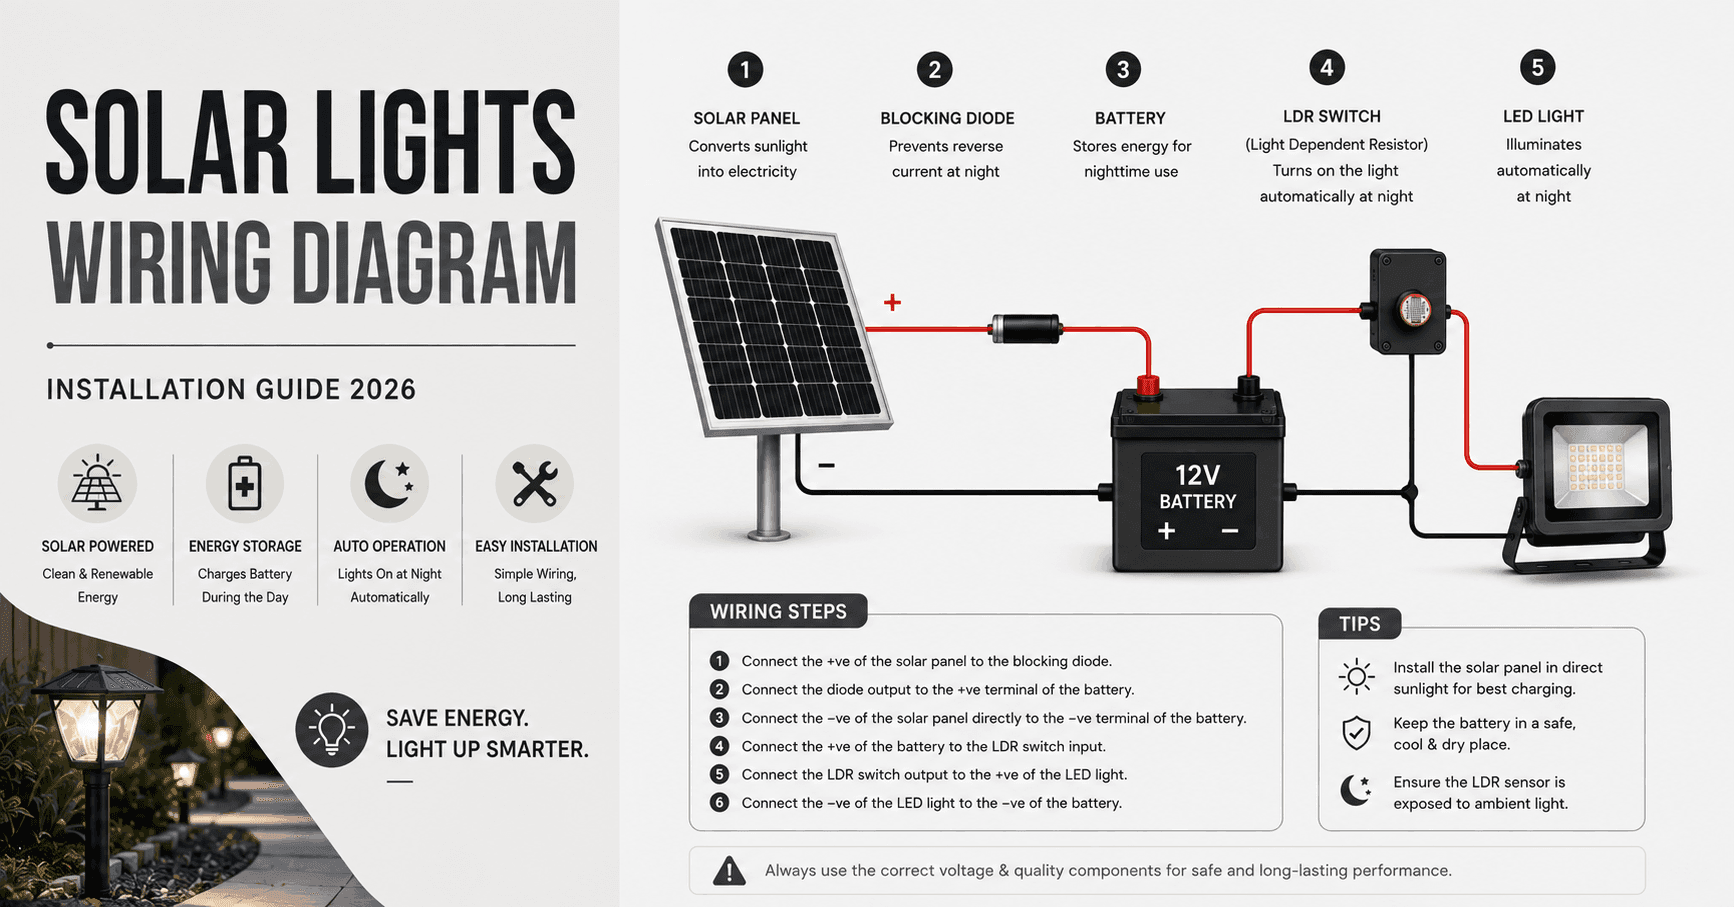
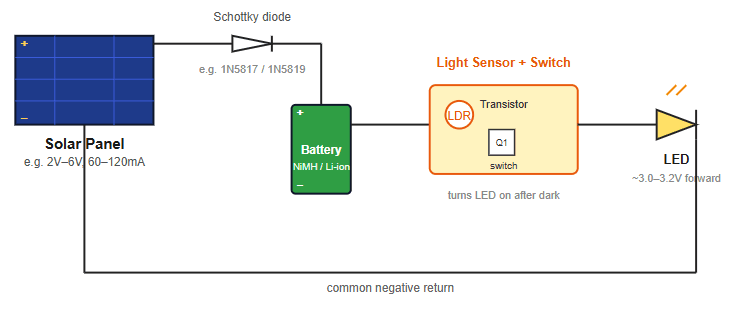
Here’s the short answer: a solar light wires together in one simple loop — panel → diode → battery → light sensor/switch → LED. The panel charges the battery during the day, and a small sensor switches the LED on once it gets dark.
Quick reference:
| Component | Common Wire Color | Connects To | Typical Voltage |
|---|---|---|---|
| Solar panel | Red (+) / Black (−) | Diode → Battery | 1.5V–6V |
| Blocking diode | N/A (in-line part) | Panel and battery | Drops ~0.2–0.4V |
| Battery | Red (+) / Black (−) | Diode and LED circuit | 1.2V (NiMH) or 3.7V (Li-ion) |
| LED | Positive lead longer | Switch/LDR output | ~3.0–3.2V forward |
Wire colors aren’t standardized across brands, so always trust the polarity marks on the part itself over the color of the wire.
Solar Light Wiring Diagram: The Basic Connection Explained
The 4 Core Components and How They Connect
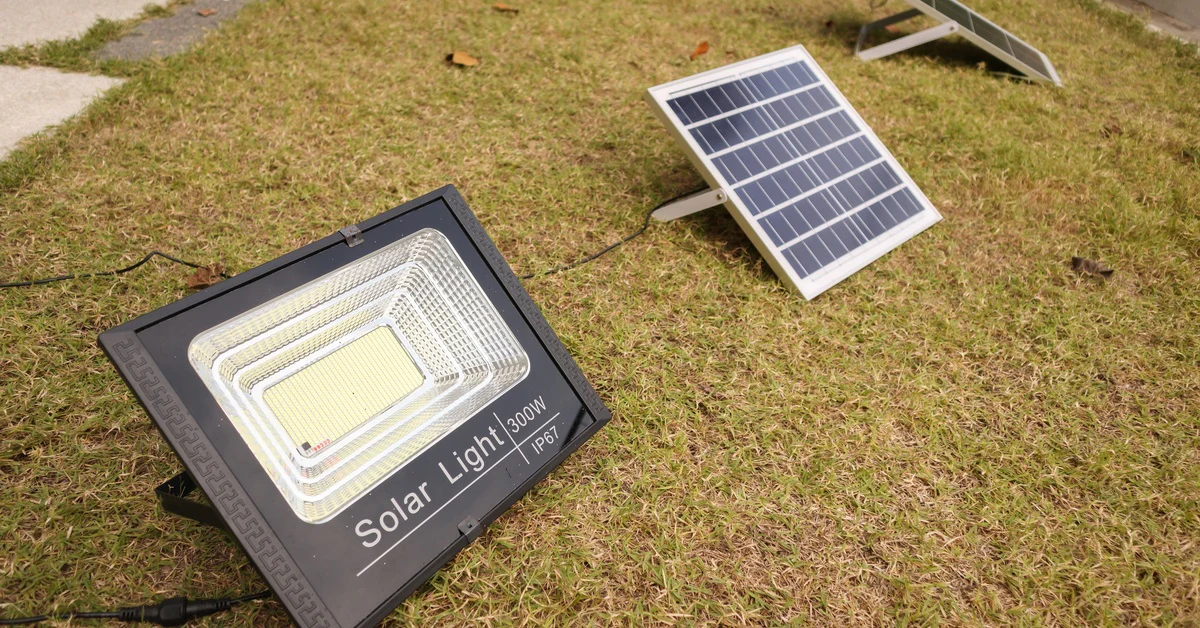
Every solar light, from a $5 pathway stake to a $150 security light, is built around the same four parts:
- Solar panel: a small photovoltaic cell that turns daylight into electricity.
- Diode: a one-way valve for current. It lets the panel charge the battery, but blocks the battery from draining back out through the panel at night.
- Battery: usually a 1.2V NiMH cell in basic garden lights, or a 3.7V lithium cell in brighter or more advanced units.
- LED: the light source itself, switched on by a sensor.
That’s it. Everything else, resistors, transistors, boost converters, exists to make those four parts work together efficiently.
Wiring Diagram: Positive to Positive, Negative to Negative
The golden rule of solar light wiring is the same rule that governs almost all low-voltage DC wiring: positive connects to positive, negative connects to negative, all the way through the circuit. Break that rule and you’ll either get nothing, or you’ll cook a component.
The diode sits between the panel’s positive lead and the battery’s positive terminal, oriented so current can only flow into the battery. In the diagram above, current flows panel → diode → battery during the day, and battery → switch → LED at night, sharing a common negative return wire.
What the Light Sensor (LDR) and On/Off Switch Do in the Circuit
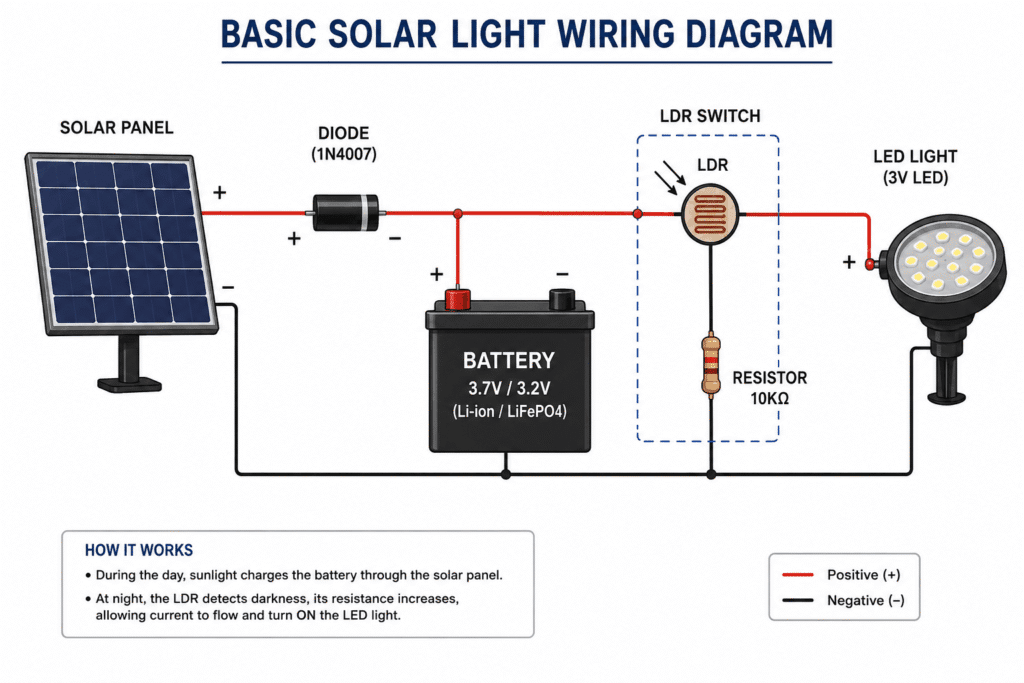
Most solar lights use a light-dependent resistor (LDR), a small photocell whose resistance changes with light. In daylight, its resistance drops, which keeps a transistor switch open and the LED off. Once it’s dark, the LDR’s resistance rises, the transistor switches on, and current flows to the LED.
Some designs skip the LDR entirely and just monitor the solar panel’s own voltage output, no light from the panel means it’s dark outside, so the light turns on automatically. It’s a clever shortcut that saves a part.
A quick honest note: wire colors genuinely vary by manufacturer. Some brands run red/black, others use unmarked twisted pairs. If your light’s wiring doesn’t match a diagram exactly, check the polarity markings on the battery and LED themselves, they don’t lie, even when the wire color does.
Solar Light Wiring Diagram with Battery (Replacing or Adding a Battery)
How the Battery Connects to the Panel and LED
The battery sits in the middle of the circuit, between the diode (coming from the panel) and the switch (going to the LED). It’s the buffer that stores daytime energy so the light has something to run on at night.
Wiring a Replacement Battery: Step-by-Step
- Turn the light off and remove it from any mounting bracket.
- Open the battery compartment (usually a small screw or a snap-fit door).
- Note the polarity before removing the old battery, take a photo if the markings are faint.
- Insert the new battery matching the exact polarity shown.
- Close the compartment and test the light in a dark room before reinstalling it outdoors.
Matching Battery Voltage and Chemistry (NiMH vs. Li-ion/LiFePO4) to Avoid Damage
Most basic garden lights use a 1.2V NiMH AA or AAA cell. Brighter or more feature-rich lights (motion sensors, higher lumen output) often use 3.7V lithium cells, sometimes with built-in protection circuitry.
Don’t swap chemistries casually. A NiMH circuit expects a lower, steadier voltage curve; dropping in a Li-ion cell without the matching charge circuitry can overcharge the cell or undercharge it, either of which shortens its life. When replacing a battery, match the voltage, chemistry, and capacity (mAh) printed on the original as closely as you can.
Common Battery Wiring Mistakes
- Reversed polarity: the light won’t charge, or the LED won’t turn on, and repeated reversal can damage the diode.
- Wrong voltage: too high can overheat components; too low won’t produce enough light or won’t hold a charge overnight.
- Wrong chemistry without protection circuitry: particularly risky with lithium cells, which need proper charge termination.
Tools and Materials You’ll Need Before Wiring
Basic Tools
- Wire strippers
- Small Phillips and flathead screwdrivers
- Wire connectors or solder and heat-shrink tubing
- A basic multimeter (for testing voltage and continuity)
Optional Tools for Multi-Light or Custom Setups
- A soldering iron, for cleaner and more durable joins than twist connectors
- Heat-shrink tubing or waterproof wire nuts, for outdoor joints
- A wire gauge chart, if you’re running longer cable runs between multiple lights
- Terminal blocks, useful when wiring three or more lights together
How to Wire a Solar Light: Step-by-Step Installation
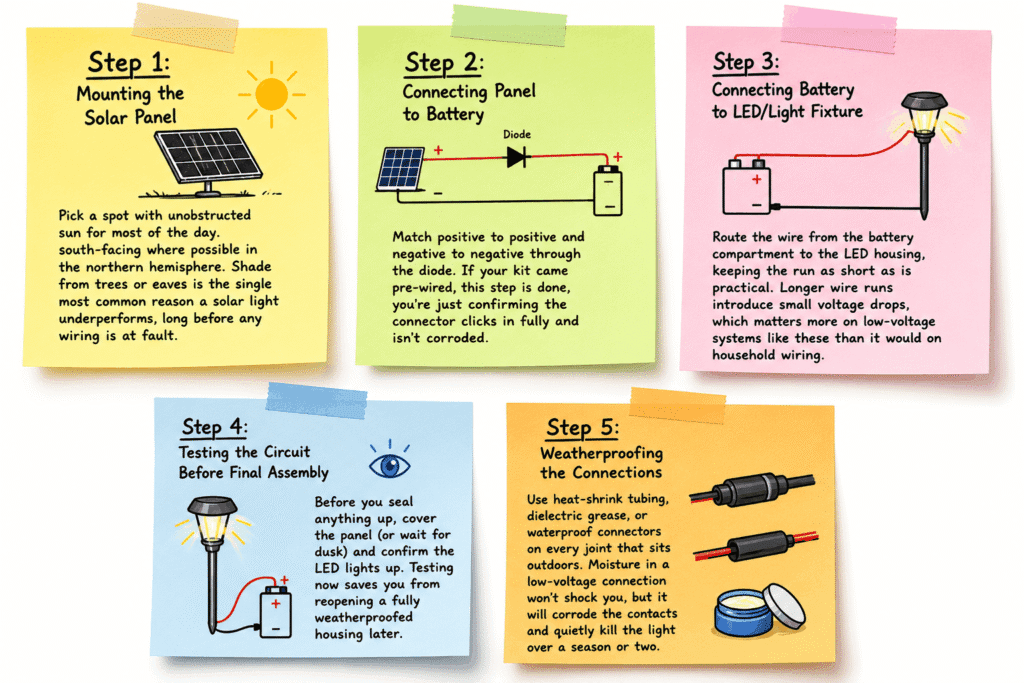
Step 1: Mounting the Solar Panel
Pick a spot with unobstructed sun for most of the day, south-facing where possible in the northern hemisphere. Shade from trees or eaves is the single most common reason a solar light underperforms, long before any wiring is at fault.
Step 2: Connecting Panel to Battery
Match positive to positive and negative to negative through the diode. If your kit came pre-wired, this step is done, you’re just confirming the connector clicks in fully and isn’t corroded.
Step 3: Connecting Battery to LED/Light Fixture
Route the wire from the battery compartment to the LED housing, keeping the run as short as is practical. Longer wire runs introduce small voltage drops, which matters more on low-voltage systems like these than it would on household wiring.
Step 4: Testing the Circuit Before Final Assembly
Before you seal anything up, cover the panel (or wait for dusk) and confirm the LED lights up. Testing now saves you from reopening a fully weatherproofed housing later.
Step 5: Weatherproofing the Connections
Use heat-shrink tubing, dielectric grease, or waterproof connectors on every joint that sits outdoors. Moisture in a low-voltage connection won’t shock you, but it will corrode the contacts and quietly kill the light over a season or two.
Wiring Multiple Solar Lights Together (Series vs. Parallel)
This is the part most solar light guides skip, or bury in language that assumes you already have an electronics background. It doesn’t need to be that complicated.
Series Wiring: What It Does and When to Use It
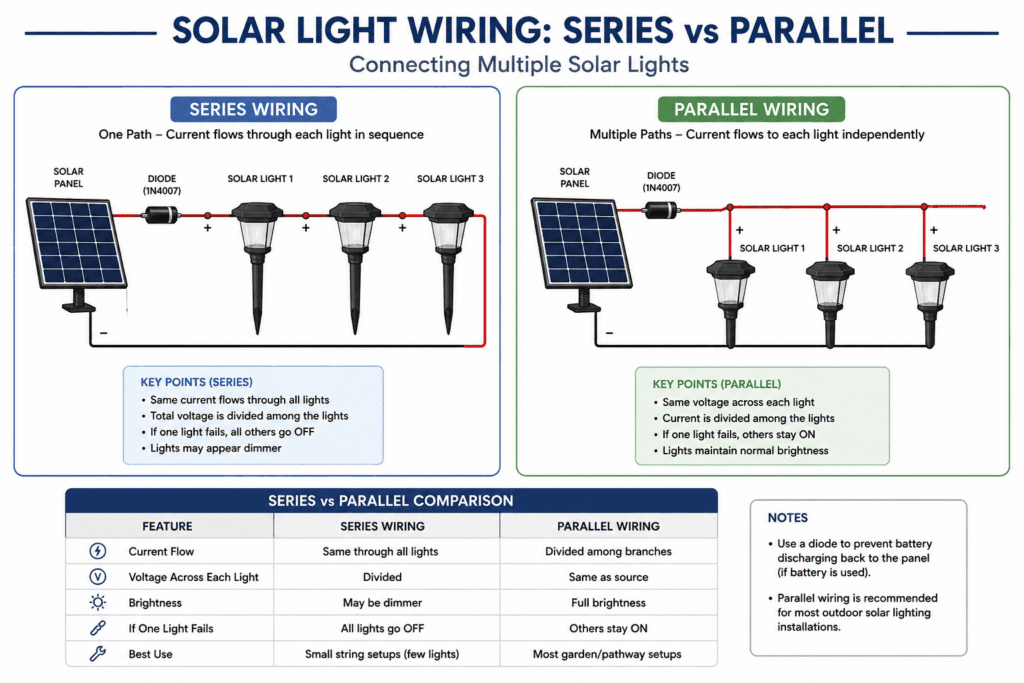
In series wiring, lights are connected end-to-end in a single loop, like old-style Christmas lights. Voltage adds up across each light while current stays the same. Series wiring uses less wire, but it has a well-known weakness.
Parallel Wiring: What It Does and When to Use It
In parallel wiring, each light gets its own pair of wires running back to the power source. Voltage stays the same across every light, while total current adds up. It costs a bit more wire, but it’s far more forgiving.
Series vs. Paralle: Which One for Garden/Path Lights?
For garden and path lights, parallel wiring is almost always the better choice. It’s the same reason modern LED holiday lights moved away from old series-strung bulbs, one dead light shouldn’t take down the whole run.
Wiring Diagram: Connecting 3–6 Solar Lights on One Circuit
For a run of 3–6 lights on a single battery bank or charge controller, run a positive and negative bus wire the length of the installation, then tap each light into that bus with a short drop wire, as shown in the parallel diagram above.
Mistakes That Cause One Bad Light to Kill the Whole String
- Wiring lights in series when one LED or connection is even slightly weaker than the rest
- Using the wrong wire gauge for the total run length and current draw
- Skipping weatherproofing at just one joint in a long outdoor run, that one point of corrosion can open the whole series loop
Solar Light Not Working? Wiring Problems and How to Fix Them
Light Doesn’t Turn On at Night
Check, in order: battery charge, LDR/sensor obstruction (dirt or debris on the sensor), and diode orientation. A reversed diode is a common assembly-line and DIY mistake, and it silently blocks all charging.
Light Turns On But Dies Quickly
This usually points to a battery that’s no longer holding a full charge, or a panel that isn’t getting enough daylight to fully charge it before dusk. Aging NiMH cells lose capacity gradually, if the light used to last all night and now fades by 10 p.m., the battery is the first thing to test.
Light Flickers or Turns On/Off Randomly
Flickering is often a loose or corroded connection rather than a dead component. Check every solder joint and connector along the circuit, particularly ones exposed to rain.
How to Test the Circuit with a Multimeter (Beginner-Friendly Steps)
- Set the multimeter to DC voltage.
- Touch the probes to the battery terminals, you should read close to the battery’s rated voltage (around 1.2V for NiMH, 3.7V for Li-ion) when reasonably charged.
- With the panel in full sun, check the panel’s output leads, you should see a higher voltage than the battery’s rating.
- Switch to continuity mode and check each wire joint for a solid connection.
When It’s a Wiring Problem vs. a Dead Battery vs. a Faulty Panel
| Symptom | Likely cause |
|---|---|
| No light at all, even fully dark | Wiring fault, reversed diode, or dead battery |
| Dim light, short runtime | Aging or undercharged battery |
| Works some nights, not others | Panel not getting full sun, or intermittent connection |
| Flickers or cuts out | Loose/corroded joint |
Advanced/Technical Section, Building or Modifying Your Own Solar Light Circuit
This section is for DIY and hobbyist readers building or modifying a circuit from scratch. If you just want your porch light working again, feel free to skip ahead to the safety tips or FAQ.
Understanding Voltage, Current, and Resistor Values in a Solar Light Circuit
A common small-scale build uses a 2V panel rated around 80–120mA charging a 1.2V NiMH cell, or a 6V panel charging a 3.7V lithium cell in higher-output designs. The panel’s voltage needs to sit comfortably above the battery’s nominal voltage so charging actually happens, even accounting for the small voltage drop across the diode.
Adding a Diode to Prevent Battery Drain at Night
A Schottky diode, such as the 1N5817 or 1N5819, is the standard choice here rather than a general-purpose silicon diode like the 1N4007. Schottky diodes have a lower forward voltage drop, which matters a lot in a low-voltage circuit where every tenth of a volt is real charging capacity lost. The diode’s anode connects to the panel’s positive lead; its cathode connects to the battery’s positive terminal, allowing current to flow only from panel to battery.
Using an LDR or Dusk-to-Dawn Sensor in the Circuit
A typical LDR-based switch pairs the photocell with a small general-purpose NPN transistor, parts like the BC547 or 2N3904 show up constantly in hobbyist builds, and a bias resistor in the 10kΩ range. As ambient light drops, the LDR’s resistance rises, the transistor’s base current increases, and it switches the LED circuit on.
Using a Charge Controller for Larger DIY Solar Light Builds
Once you move beyond a single small panel and battery, say, a multi-panel setup or a larger battery bank for a security light — a basic charge controller is worth adding. It protects the battery from overcharging and, in more advanced designs, prevents deep discharge that can shorten a lithium cell’s lifespan.
Custom Wiring for Solar Security Lights or Motion-Sensor Lights
Motion-sensor solar lights add a PIR (passive infrared) sensor module between the switch and the LED driver, so the light can stay in a low-power standby mode and jump to full brightness only when it detects movement. This draws more current in bursts, so these builds typically use a larger battery (a 3.7V lithium cell in the multiple-Ah range) rather than a basic AA NiMH.
Solar Light Wiring Safety Tips
Avoiding Reverse Polarity
Always check + and − markings before connecting a battery or panel, especially after a repair. Reverse polarity rarely causes a fire risk in these low-voltage systems, but it reliably damages diodes and can prevent charging entirely.
Weatherproofing Outdoor Connections
Every joint that lives outside should be sealed, heat-shrink tubing, dielectric grease, or a proper waterproof connector. This single habit prevents most of the “it worked last summer” failures.
When to Call a Professional
Small battery-powered garden and path lights are DIY-friendly. If you’re working with a hardwired, mains-connected solar system, or a larger installation tied into your home’s electrical panel, that’s a job for a licensed electrician, the stakes and the voltages are a different category entirely.
FAQs
How do you wire a solar light to a battery?
Connect the solar panel’s positive lead through a blocking diode to the battery’s positive terminal, and the negative leads directly together. The battery then feeds the LED through a light-sensing switch.
Can I wire two solar lights to one battery?
Yes, if the battery has enough capacity for both. Wire them in parallel, each LED circuit tapping into the same positive and negative bus, so one light failing doesn’t affect the other.
What happens if you wire a solar panel backwards?
The panel won’t charge the battery, and depending on the circuit’s protection, it can stress or damage the blocking diode. It won’t damage the panel itself.
Do solar lights need a diode?
Yes. Without a blocking diode, the battery can slowly discharge back through the panel at night, draining itself even when the light isn’t in use.
Can solar lights be wired in series?
They can, but parallel wiring is generally the better choice for multi-light runs, since one failed connection in a series loop can take out every light after it.
Why is my solar light wiring diagram different from my light’s actual wires?
Wire colors aren’t standardized across manufacturers. Trust the polarity markings on the components themselves rather than assuming red always means positive.
How many solar lights can I connect on one circuit?
It depends on your battery bank’s capacity and the current draw of each light. A common small setup runs 3–6 lights in parallel off a shared battery bank or charge controller.
Can I replace a solar light’s rechargeable battery with a regular one?
No, standard non-rechargeable batteries aren’t designed to be charged and can leak, swell, or fail if placed in a charging circuit.
What gauge wire do I need for solar lights?
For short runs at low current, standard 22–18 AWG wire is typically sufficient. Longer runs or higher-current setups (like multi-light security systems) may need a heavier gauge to limit voltage drop.
How do I know if my solar light wiring is bad vs. the battery is dead?
Test with a multimeter. If the panel shows a healthy voltage in sunlight but the battery never reads a charge, suspect the diode or a broken connection. If the panel and wiring test fine but the battery reads low or won’t hold voltage, the battery itself is the culprit.